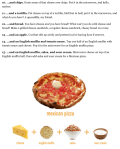
So, you like lasagna but it’s a little too heavy for you, not to mention kind of a pain in the butt to prepare? Here’s something my mom makes that’s ridiculously delicious, easy to make, and there isn’t a lot of cleanup afterwards, which is a big plus.
What you’ll need:
– Sliced bread (you can buy the crust-less kind or cut off the crusts yourself)
– Ham
– Cheese
– Tomato sauce (for yummiest results, make it nice and thick, but you can definitely just use the stuff from a jar if you don’t feel like making your own sauce. Just don’t buy the chunky kind)
How to make it:
– Heat up your sauce. Yes, you can do it in the microwave, just make sure it’s in a microwave-safe container.
– Preheat your oven.
– In an oven-safe dish, pour a thin layer of sauce, just enough to cover the bottom of it.
– Add in a layer of bread slices, then a layer of ham, then cheese, then sauce. (if it sounds confusing, I’m adding a picture for reference!)
– Repeat. Finish with bread and a generous scoop of sauce on top of it.
– Cover with tinfoil and stick it in the oven for about 10 minutes, just enough for the cheese to melt.
– Enjoy!
(to mods: I’m submitting the image as a separate submission, if that’s okay? Tumblr is very annoying about this.)
Tag: recipes
European-Style Bread (AKA Not Toast)
This is a recipe for baking your own bread. Note, this will not give you “toast” bread, but a proper loaf of bread – which is why I call it European-style, as AFAIK most US-Americans think of toast when they hear the word bread. This ain’t that! It’s better. 😀
Baking bread can seem intimidating, but it’s actually very straightforward. It’s about 15min of work in total and 3h of waiting. There are actually only three steps (mix, rest, bake) but I detailed them as much as possible below, because I prefer very detailed recipes with clear instructions.Ingredients:
– 660g flour or about 23,3oz. (I use white flour specifically for bread, which is cheap where I live; you could try with other kinds, it should work fine, but I can’t vouch for it)
– 12g or about 0,42oz. salt
– 8g or about 0,28oz. dry yeast (or one of the small packages, depending on what you buy)
– 35g or about 1,23oz. oil (I use olive oil, other kinds can work too) + additional oil for your baking form
– 350g or about 12.34oz. warm water (not hot, warm; the yeast likes warmth)Tools:
– a bowl large enough for mixing in
– a scale for weighing
– cloth for draping
– a kneading device if you can’t knead it manually (optional)
– an oven
– a baking form
– a knife (optional)Instructions:
1. Measure ingredients in the bowl, dry first, wet last.2. Mix well with your hands or your kneading device (I have never tried this but in theory it should work; DO NOT USE A BLENDER! The dough will not mix in that! It’s way too sticky and heavy). You don’t even need to put a lot of strength into it; just keep mixing the dough for ten minutes and it should be fine. Don’t pull it apart while mixing, but rather squish it together and roll it over; you want it to be a dense mass. After about three to five minutes you should have one solid lump of dough, and after ten minutes it should be smooth. If it’s silky smooth and does not stick to your hands anymore, you are done. Note, do not put flour on your hands before mixing, and do not mix it on a floured surface; this adds more flour to the mix and makes it too dry. Just mix it in the bowl you measured the ingredients in.
3. Rest the dough in the bowl for an hour in a warm location (e.g. on top of or nearby your heater), covered with a cloth. Make sure it is warm but not too hot; the yeast can’t stand too much heat. During this hour the dough should about double in size.
4. Knead again after the time is up to get rid of the air bubbles inside the dough. Just a minute or two will be enough, you only want to get it back down to its original size.
5. Prepare the baking form by oiling the inside so the bread won’t stick to it while baking, then transfer the loaf into the baking form. Make sure there are no air bubbles left inside by squishing down on it a bit.
6. Rest again for another hour in a warm location, again covered with a cloth. It should once more double in size.
7. Preheat the oven to 170°C (about 340°F) if using circulatory air and 180°C (about 355°F) if using upper and lower heat at least 10 minutes before the resting time is up.
8. (Optional) Slash the top of the bread diagonally or along its length, about 1cm or half an inch deep just before you put it in the oven. This makes for a nicer crust that is easier to cut in my opinion, but it’s not absolutely necessary.
9. Bake for 40 minutes, then let it cool. Would recommend eating the first crust piece when it’s still warm, though, for maximum awesome.
And bam, you just made bread! And bread that keeps pretty well, too. Enjoy your air hole-free, tasty bread.
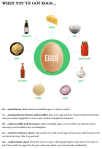
Make-ahead Breakfast Sandwiches
Ingredients:
- 6 eggs
- 6 croissants (or bagels, or biscuits…any breakfast food bread really!)
- Cheese (I like mozzarella, personally)
- Meat (optional, I like prosciutto but any breakfast meat will work)
- Milk (optional)
- Salt and pepper, to taste (optional)
Preparation:
Prepare time: 5 minutes
Cook time: 15 minutes
- Preheat your oven to 350 degrees.
- Spray 6 molds of a muffin tin with non-stick cooking spray.
- Crack an egg into each mold and whisk gently with a fork. Add a splash of milk and salt/pepper if desired. (Milk will make the egg fluffier)
- Cook in oven for 15 minutes or until firm.
- Immediately remove and let cool on plate.
- Refrigerate the cooked eggs for later use.
Assembly:
Assembly time: 2 minutes
- Cut open your croissants (or other breakfast foods) and add cheese and egg puck.
- Microwave for 30 seconds or until cheese is melted.
- Add meat if desired.
Chorizo and Egg Breakfast Tacos
This is an absolute favorite of mine because it’s fast, cheap, warm, reheats well, and tastes way more luxurious than it actually is! You can make it in a single small skillet too, so cleanup is super easy. I like to make these on Monday or Tuesday nights, and have them for breakfast for the rest of the week.
Ingredients:
Half a pound of prepackaged prespiced chorizo (it’s a dollar a package at my supermarket, itll be near the breakfast sausage)
Three eggs (a dozen is a dollar fifty in my area)
A pat of butter (or margarine, or just skip it if you’re not feeling it)
Tortillas (a dollar for ten in my area)
Steps:
1: Get your small skillet on the stove and let it get to upper-medium heat. It’s 7 out of 10 on our stove’s range.
2: Once the skillet is hot, cut open the package and dump the chorizo in. Cook it like you would taco meat and really separate it all out to cover the surface.
3: Toss in a pat of butter or margarine, or just skip this step if you’d rather. The butter will add a little more savory breakfast-y goodness to it though!
4: Let the chorizo cook for about ten minutes. Stir it frequently but gently, this is a quick meal but no need to rush things. I just eyeball it, and once it gets the crumbly consistency of cooked ground meat I move to the next step.
5: Crack in your eggs and scramble them in. Really stir it at this point, you want the eggs to soak up all the flavor of the chorizo. Once the eggs are done, it’s ready to throw into tortillas and eat!
You can add in more ingredients as it cooks too, like potatoes, onions, cooked rice, peppers, etc. Basically, if it sounds good in a breakfast taco then try it! It’ll stretch everything much farther too.
As described above, it’ll make enough for about three meals, or roughly nine tacos. If I’m really going all out I’ll add on some cheese and sour cream after reheating them.

oh this is a life saver
So these are both “Aw Fuck I’m outta real food” meals BUT ALSO: if you’re learning how to cook, these are great “baby steps” meals to learn how to cook basics into something enjoyable without “wasting” anything expensive. Though I maintain that even cooking screw-ups are valuable in terms of lessons learned.
Also they’re great for when you get absorbed in something and you realize your blood sugar is dropping and you need to make something Quick.
They’re also fantastic for spoonies with limited mobility and chronic pain that makes cooking really hard and painful! Thanks for sharing OP 😀
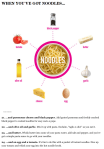
Stovetop Hash Brown Quiche
I love quiche. I especially love hash brown crust quiche. But it takes forever and a day to cook properly and requires a boatload of eggs. So, I improvised.
INGRIDIENTS:
– 1-1.5 cups of shredded potato. You can use frozen hash browns, but if you can’t find them, invest in one of these mandolins and shred your own by sticking up the blades (it really takes minimal effort, promise)
– 4 eggs
– A little milk (non-dairy milks work fine)
– Any spices or toppings you want to add! (I used chives, dill, salt, and pepper— but if you’re going to toss any meat in here, make sure it’s pre-cooked!)
METHOD:
Grease your frying pan and dump the potatoes in to cook. Stir them occasionally to make sure they cook evenly— if you’re making it thick/using a small frying pan like I was, you’ll need to stir. Add salt and pepper, or skip the salt if low sodium
While you’re waiting, stir up the eggs, milk, and spices in a bowl.
When the potatoes are nearly cooked (when you cut into them, they have some resistance but are mostly floppy), dump the eggs in and cover with a lid so they steam.
Wait for the eggs to set completely, then remove from heat, cool, and either eat immediately or store in the fridge for up to a week. Can be made in bulk with a bigger frying pan!
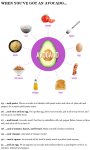
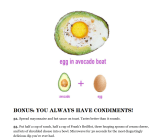
instagram breakfast (or lunch)
this recipe is cheap and pretty (just like me).
ingredients:
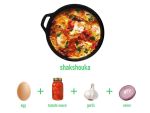
- 1 egg
- 1 half avocado
- 1 cup cherry tomatoes
- 2 cups raw spinach
- vinegar (white or rice wine – not apple cider)
- soy sauce (or liquid aminos to make this recipe gluten free)
directions:
- cut the cherry tomatoes in half and throw in a bowl. add in two tablespoons white vinegar and two tablespoons soy sauce.
- heat up 1 tablespoon oil (vegetable, olive, or coconut) on medium. toss raw spinach in and sautee for 2-3 minutes until wilted. place spinach on plate.
- crack egg into pan. cook for two minutes until whites are solid. turn pan off, flip egg, and wait 10 seconds. scoop up egg with spatula and place on plate on top of spinach.
- cut avocado in half and scoop out half with a spoon. place on plate next to egg and spinach.
salt to taste and enjoy! i always grew up eating filipino breakfast and my favorite part was the tomatoes in vinegar and soy sauce. they add the perfect salt, acid, and brightness!
if you want to make this more filling, add some white rice on the side.
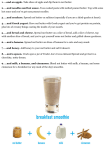
Super Easy Banana Smoothie
This probably seems super easy, but since I live in a college dorm I was blown away when I realized I could do this. 1 serving banana smoothie, no blender required! (I would suggest using browning bananas for ease of mashing though)
What you need:
- bowl or wide cup
- fork
- spoon
- plastic bag
- banana (as many as you want your smoothie to be)
- milk (I prefer to use almondmilk for this)
- honey
- ice
What to do:
- Peel your banana and cut it up into the cup/bowl. Use your fork and spoon (whichever is easier) and mash the banana into babyfood consistency.
- Add milk a little at a time, stirring and mashing like mad.
- Add a little bit of honey for some extra sweetness, then keep mashing and stirring. Get out all the lumps!
- Fill the plastic bag with ice. Smash the heck out of that ice bag until the ice is finely crushed.
- Add some of the ice to your smoothie and stir it up. This is if you want it immediately, you could also just stick it in the fridge for an hour or two for the same effect.
- Enjoy!
Salsa Chicken
This recipe is about as easy as it gets and delicious!
Ingredients:
Chicken (I usually use a package of 4-6 breasts but it can be whatever you like)
Jar of salsa (can be smaller or larger can depending how saucy you like things)
Shredded cheese (optional)
Rice or any sides you want (It goes really with Uncle Ben’s Spanish style rice)
Put chicken in a baking dish (I use a glass rectangular one) dump the jar of salsa over the chicken. Bake at 350 degrees for about 40 mins or until chicken is cooked. Take chicken out of oven and (if you want) cover with shredded cheese and either put it back in the oven for a couple minutes or just cover the dish for a few minutes to melt the cheese. I usually make Uncle Ben’s Spanish style rice to go with it but you can make any rice or any other veggies or sides you want. (You could also make the chicken in a slow cooker if you prefer).
Easy Gravy
This recipe has saved me so many times making mashed potatoes!
Ingredients:
- Chicken or beef boullion cubes (substitute with chick’n vegan boullion cubes and your easy gravy is vegetarian and vegan friendly!)
- Flour
- Butter or butter substitute
Instructions:
- In a saucepan or small pot, heat boullion cubes with water until they are completely dissolved. Use 1 cup of water + 1 cube for every cup of gravy you want to make. So 2 cups of gravy, would be 2 cups of water and 2 cubes.
- In a separate pot, mix your flour and butter together, using 2 tablespoons of flour for each 2 tablespoons of butter. This will be your roux. Cook the roux on medium heat for about 3 minutes.
- Slowly pour the boullion water into the roux and stir/whisk constantly. You want to pour slowly and mix quickly to avoid lumps. Mix until the gravy is desired consistency and lump-free.
- Taste test before serving, and add anything additional if you’d like (salt, pepper, spices)
